Recombinant prion protein, Rocky Mountain-style
During our month-long visit to Byron Caughey’s group at Rocky Mountain Labs in Hamilton, MT, we have been incredibly impressed at how easy it is to run the RT-QuIC assay. The hardest part about RT-QuIC, though, is the preparation of the recombinant PrP substrate. Andy Hughson, the lab’s expert recombinologist, gave us a detailed walkthrough while we were here, and the following week, we set out to repeat the whole protocol ourselves. In this post I’ll share what we learned.
protocol and overview
We used this protocol, and I’ll give more details on exactly how we did everything below. The principle here is to grow a liter of E. coli cultures induced to express the PrP molecule of interest, purify the PrP from inclusion bodies by cell lysis and repeated centrifugation, and then purify it by nickel affinity chromatography.
Day 1, morning
On the first day, you’ll start growing one liter of bacterial culture. This protocol assumes you already have E. coli expressing the recombinant PrP of interest under control of the lac operon - further details of the induction system will be discussed shortly.
To begin, you’ll need:
- A stock of bacteria
- A liter of luria broth (LB)
- Chloramphenicol and kanamycin - two antibiotics to which your desired bacteria are resistant (to kill any other bacteria which may try to compete with them).
- Two 10 mL mini culture tubes with loose caps (to allow the bacteria to breathe).
- One autoclaved, sterile 4L culture bottle with a breathable cap (again, to allow bacteria to breathe).

For each liter of LB add 1 mL of 34 mg/mL chloramphenicol and 1 mL of 50 mg/mL kanamycin - just pipette these directly into the bottle the LB is in. Andy has found that this can be done outside the hood, as the antibiotics are quite effective at preventing contamination. Mix and add 4 mL of the mixture to each of two 10mL sterile culture tubes which will be used to grow mini cultures. In this first step, the bacteria is grown up in mini cultures without induction of rPrP protein production. The resulting cultures are used as a starting point to inoculate the full 1L culture in which rPrP production will be induced. There are two reasons not to just put 8 mL into one mini culture tube: (1) robustness - if one culture fails, the other may yet be usable, and (2) the bacteria can’t breathe as well when the tube is too full of liquid.
Now you’re ready to inoculate your mini cultures. Remove your bacteria stock from the freezer. Bcteria cultures are stored at -80°C as a glycerol stock (1ml cell culture + 0.3ml 50% glycerol). The glycerol prevents the stock from freezing solid and killing most of the bacteria with ice crystals; an added benefit is that it freezes soft enough that you can scrape some of the material out without having to thaw the aliquot. Mini cultures are inoculated directly from the frozen stock, though some labs would choose to streak the stock on an agar plate first and pick colonies. Simply take a sterile inoculating tip, scoop out a dab of the stock and mix it into the 4 mL of LB in the mini culture tube. Repeat for the other tube.

Now place the two mini culture tubes in a shaker at 37°C and 225 rpm for approximately 6 hours. This is about the right amount of time for the bacteria to exhaust their exponential growth phase in the volume of broth provided. They can continue to survive (but not appreciably multiply, i.e. they are in stationary phase) for many hours longer, but it’s good to grab them around the 6 or maybe 8 hour mark if possible.

Day 1, afternoon
After the ~6 hours are up, come back and retrieve your mini cultures. By now instead of the transparent yellow color of the LB, they should be cloudy, indicating they are rich with bacteria (see image below). All you’ve done so far is grow bacteria, you haven’t actually induced them to produce any PrP yet. In the next step you’ll keep growing them while inducing PrP production.
The bacteria that we use express PrP under control of the lac operon. This system evolved to allow bacteria to express the enzymes to digest lactose when, and only when, lactose is present (and more preferred energy sources such as glucose are absent). Under normal conditions (in the absence of lactose), the lac repressor is bound to the lac operator DNA sequence and prevents transcriptional activation. When lactose binds to the lac repressor, it changes the latter’s conformation, releasing it from the DNA and thus causing and changing its conformation and causing it to release the lac operator DNA sequence, thus allowing the necessary genes to be transcribed. Thus, to cause the bacteria to produce PrP, you need to add lactose or some agonist thereof. Many molecular biology labs use IPTG, which is an agonist which cannot be broken down by the enzymes that digest lactose, and thus stays “in action”, continuing to induce protein expression, indefinitely. The Caughey lab sometimes uses EMD Millipore’s Overnight Express kit, whose exact composition remains mysterious to me after reading the company’s text about it. In our particular prep, we used a homemade recipe that appears to have derived originally from Studier’s autoinduction recipes. Our recipe relies on alpha lactose to induce the lac operon; it also provides just enough glucose to allow the bacteria to multiply rapidly before they deplete it and are forced to fall back on lactose. For the exact recipe that we followed, you’ll need:
- The 1L of LB (actually the 992 mL remaining)
- Mini-cultures
- 4L culture flask
- 1 mL of 1M MgSO4
- 20 mL of 50X "5052", which is (recipe for 500 mL of 50X):
- 125g glycerol (weigh in beaker)
- 365mL water
- 12.5g glucose
- 50g α-lactose
- 50 mL of 20X "NPS", which is (recipe for 500 mL of 20X):
- 450mL H2O
- 33g (NH4)2SO4 (0.5M)
- 68g KH2PO4 (1M)
- 71g NaH2PO4 (1M)

First pour the LB into the culture bottle, followed by the MgSO4, then the NPS and 5052, then the mini cultures. Note that although the bottle is 4L in volume, we only use it to grow 1L of bacterial culture, because this gives them plenty of aeration. In fact, the bottle contains a plastic ridge down the center which helps with aeration as well. Once you’ve combined the ingredients, swish them around, then place the bottle in the shaker/incubator, again at 37°C and 225 rpm, this time for ~20h.

Troubleshooting tips from Andy Hughson: It is possible that conditions in your laboratory will differ from those in the Caughey lab - so if the exact numbers in this post don’t produce good results for you, here are some pointers. First, you can adjust your culture container, number of hours and RPMs to achieve maximum bacterial growth so that you get the largest possible pellet - this means providing plenty of aeration, and growing long enough to exhaust the exponential growth phase, and if necessary you can even run a little ways into stationary phase. Second, though the principles of induction are the same, different induction kits or homemade recipes will differ in details, so do read the instructions on your kit before proceeding. Two helpful references for induction are [Fox & Blommel 2009 and Studier 2005, full text here].
Day 2
As with the 6h timepoint for the mini-cultures, the 20h timepoint for the 1L culture is chosen to allow the bacteria to just exhaust their exponential growth phase without spending too long in a state of arrested development (i.e. stationary phase). If you grab them at 24h, that’s not too big a deal. As with the mini-cultures, the liquid should now be cloudy. Pour it into four 250 mL conical tubes and centrifuge them at 2900g for 20 minutes. After this step, the bacterial solids will be in a pellet at the tip of the tube - this is what you want. Pour off the supernatant back into the culture flask and decontaminate the flask with bleach. Don’t leave the bleach to sit for more than 5 or 10 minutes before pouring it out, because the flask is made of porous material that will absorb it, inhibiting the growth of future cultures. After decontaminating the solution this way, the flask can be autoclaved before next use.

At this point, you have four pellets of bacterial solids. If you want to deal with them right away, you can; or it may be a convenient timepoint to throw them in the -20°C overnight and get started in the morning. If you do that, then just warm them briefly at 37°C before proceeding.
Day 3
Use a serological pipette to add 14 mL of 1X Novagen BugBuster (other lysis buffers might work equally well) to each conical tube containing a pellet. The BugBuster’s exact formula is proprietary but at a minimum it contains SDS to disrupt cell membranes and Benzonase (a nuclease that can digest both DNA and RNA) to get rid of nucleic acids. BugBuster costs about $500 per bottle and you use about a third of a bottle for one prep. BugBuster is stored at 4°C and this may cause SDS to precipitate out, but if this happens, just let it warm enough for the SDS to go back into solution before you use it. Next, use a spatula to scoop the pellet out of the tip of the tube and transfer it to a 50 mL Falcon tube. Note that this Falcon tube will undergo intense centrifugation; Andy has found that the orange-topped Corning tubes are less strong and more liable to crack under the pressure.
![]()
Once the mixture is in Falcon tubes, you need to grind it up. This can be done in a variety of different ways. The currently preferred method is to use a ~$300 Omni Tissue Homogenizer with ~$10 disposable tips. Previously they have used the BioSpec Bamix 2009-5, which is no longer on the market though this product appears to be nearly identical. The Bamix is basically an industrial grade hand blender. This is even more effective than the homogenizer, but it has a reusable metal tip which you need to be highly scrupulous about cleaning - Andy has done this with alternating washes of alcohol and detergent. Bleach would work but can corrode the stainless steel. The really old way they did the homogenization was with repeated pipetting and then repeated freeze-thaw cycles on liquid nitrogen. That was both more labor-intensive and less effective than the new way and is not recommended. The purpose of this step is to simply to break up the pellet so that the chemicals in BugBuster can act on individual cells. Don’t overdo this step and froth the solution - the goal is a nicely blended homogenate.

Once the mixture is homogenized, place the tubes on a rotating rack (“gentle inversion”) at room temperature for 20 minutes.

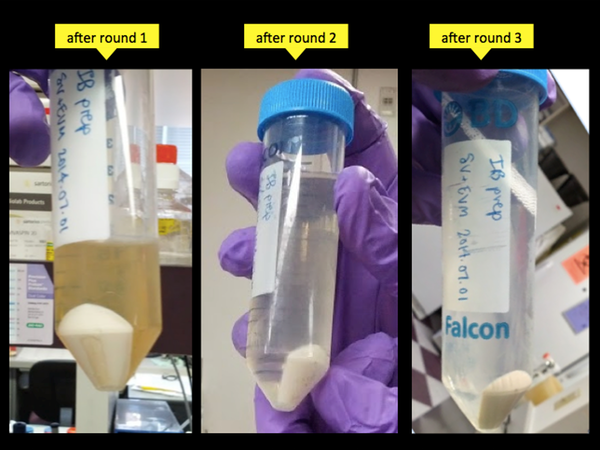
After these 20 minutes, the cells should be mostly lysed and nucleic acids mostly digested. Monomeric bacterial proteins will be in solution, but your recombinant PrP is special. Foreign proteins produced at very high levels in bacteria end up aggregating into inclusion bodies in the bacteria. Because it is found in these high molecular weight aggregates, the PrP will pellet out readily. Therefore the next step is to centrifuge these tubes at 13,000g for 20 minutes. This amount of g force is enough to create tiny cracks in the Falcon tubes, but only once has Andy ever had one outright break. Even slightly more force, though, and you can get breakage. The centrifugation can be performed at a range of temperatures - we did it at 4°C but room temperature is probably fine too. Be sure to retrieve your tubes promptly after the centrifugation cycle ends - otherwise the pellet will start to become soft and will be harder to separate from the supernatant.
Remember, here PrP is in the pellet because it is aggregated. The supernatant can be discarded. The pellet should be hard enough that you can simply pour off the supernatant.
Now you’ll repeat the last few steps, with only slight modifications, twice. Re-homogenize the pellet in 14 mL of 1X BugBuster and rotate at room temperature for 20 minutes. After the 20 minutes, we’ll assume that all the lysis that is going to happen has already happened, and we’ll begin to wash the pellet. This means topping up to 40 mL total with a diluted solution of 0.1X BugBuster. Then spin again at 13,000g, this time for 15 minutes, and pour off the supernatant. The third time around, you can re-homogenize entirely in 30 mL of 0.1X BugBuster since you’re just washing the pellet. Don’t bother rotating the tubes on the rotisserie this time, just shake them back and forth a few times and go straight to the centrifuge. By this point, odds are the tubes are showing tiny cracks, so drop your speed to 8,000g and keep your time at 15 minutes.
Over the three cycles of homogenize-and-centrifuge you’ll notice that the supernatant gets progressively more clear. At first there are lots of monomeric bacterial proteins in solution, giving it a transparent brown appearance, but by the end most of these have been removed and the supernatant is nearly colorless.
Pour off the last round of supernatant, and now you have another optional breakpoint: you can throw the final pellets in the -20°C overnight and come back to this process the next day.
Before you go home, though, check whether you have all the solutions you need for tomorrow. You’ll need five different solutions on Day 4:
- 8M GdnHCl in 0.1M NaPO4 at pH 8
- Denaturing buffer
- Refolding buffer
- Elution buffer
- Dialysis buffer
You’ll need 42 mL of the GdnHCl first thing in the morning, so definitely make that up now if you don’t have it already. The others you can make now, or you can probably find time to make them tomorrow between other things if you’re ready to be done for the day. Regardless, I’ll give recipes for each here.
1. 8M GdnHCl in 0.1M NaPO4 at pH 8
Guanidine hydrochloride is a chaotropic salt which, at high concentrations such as 8M, fully denatures proteins. At lower concentrations it partially denatures them, and it and has been used in many classic protocols related to prions [e.g. Kocisko 1994, Safar 1998]. The exact chemical mechanism by which GdnHCl denatures proteins is evidently still a subject of debate [Lim 2009]. In any event, the purpose of this solution is to completely denature PrP, to convert it from its aggregated form in the bacterial inclusion bodies into monomeric PrP.
GdnHCl can destroy pH meters too, so measure the pH of your NaPO4 solution before adding GdnHCl to it - the GdnHCl will not appreciably alter the pH. The process of making the 8M GdnHCl solution harbors some surprises. 8M GdnHCl means 38g of GdnHCl brought to a final solution volume of 50 mL. But when you go to measure out 38g of crystalline GdnHCl, which has a loose-packed texture kind of like brown sugar, you will find that its volume is already a bit greater than 50 mL. Don’t worry - it will lose volume when it dissolves. Add just a bit of the NaPO4 solution, and the tube will become cold because solvation of GdnHCl is highly endothermic. Place the tube on the rotisserie at room temperature to rotate overnight, where the GdnHCl will go slowly into solution. In the morning, if it is still not entirely dissolved, you can incubate it at 37°C for a while. Once all the GdnHCl is in solution you can Q.S. it to (i.e. bring it to) 50 mL total (with NaPO4 solution) and then filter it through a Nalgene flask.
2. Denaturing buffer (pH 8)
This and the next two solutions are all based on two sodium phosphate stocks as a base. You can make these and keep them around.
- 0.2M monobasic phosphate stock: 24g Anhydrous Sodium Phosphate Monobasic (NaH2PO4) in 1L H2O
- 0.2M dibasic phosphate stock: 28.4g Anhydrous Sodium Phosphate Dibasic (Na2HPO4) in 1L H2O
Each of these three solutions - denaturing, refolding and elution - have as their base a balance of monobasic and dibasic sodium phosphate solution to achieve the right pH, plus Tris as a buffer. In the case of denaturing buffer, there is also 6M guanidine, enough to keep the PrP completely unfolded. All of these solutions should be filtered through a Nalgene filter vacuum flask before use, both to prevent bacterial contamination and to remove any particulates which could clog the FPLC machine. Remember to rinse some dH2O through the filter before filtering the solutions, in case the filter itself sloughs off any particulates.
The recipe for 300 mL of denaturing buffer is:
- 142.1mL 0.2M Dibasic
- 7.96mL 0.2M Monobasic
- 0.3634g Tris (this / 121.14 g/mol / .3L = 10 mM final)
- 171.9g GdnHCl (this / 95.5 g/mol / .3L = 6M final)
- Q.S. to 295 mL with dH2O, then check pH, and add individual drops of HCl if needed to bring pH down
- Q.S. to 300 mL with dH2O
- Filter before use.
3. Refolding buffer (pH 8)
Refolding buffer is exactly the same as denaturing buffer but without the GdnHCl. Minus that denaturant, it allows the PrP to refold into its normal, alpha helical conformation. You need more of it though, so the recipe is for 600 mL instead of 300 mL:
- 284.1 mL 0.2M Dibasic
- 15.9 mL 0.2M Monobasic
- 0.7268g Tris (this / 121.14 g/mol / .6L = 10 mM final)
- Q.S. to 590 mL with dH2O, then check pH, and add individual drops of HCl if needed to bring pH down to 8
- Q.S. to 600 mL with dH2O
- Filter before use.
4. Elution buffer (pH 5.8)
Elution buffer is similar to refolding buffer but with a different proportion of di- and mono-basic phosphate solutions to get us more in the neighborhood of the desired pH, which is 5.8 this time. It also contains a large amount of imidazole, which is how it elutes PrP - more on this later. Imidazole raises the pH, so you are likely to need to adjust with a good bit of HCl to get it back down to 5.8.
The recipe for 500 mL of elution buffer is:
- 20mL 0.2M Dibasic
- 230mL 0.2M Monobasic
- 0.6056g Tris (again, 10 mM final)
- 17.017g imidazole (this / 68.08g/mol / .5L = 500 mM)
- Q.S. to 490 mL with dH2O, then check pH, and add individual drops of HCl to bring pH down to 5.8. This usually requires a lot of HCl.
- Q.S. to 500 mL with dH2O
- Filter before use.
5. Dialysis buffer (pH 5.8)
Dialysis buffer is simply a weaker solution of sodium phosphate in dH2O, with nothing else. You need a lot of it. For each 3.6L:
- 14.3mL of 0.2M Dibasic
- 166mL of 0.2M Monobasic
- Q.S. to 3.5L, adjust pH to 5.8 with HCl
- Q.S. to 3.6L (obviously at this large a volume, it doesn't need to be too exact)
Day 4
Day 4 will be a long day - unlike the other days, where you had just a few timepoints, today’s activities will keep you pretty continuously busy for a few hours in the morning, then you’ll have a 4.5 hour break, then you’ll need another couple of hours in the late afternoon.
After you poured off the final round of supernatant, you were left with pellets considerably smaller than the pellets you started with, housed in a Falcon tube considerably smaller than the 250 mL conical tubes you started with. You’ve already removed much of the non-PrP material from the bacteria, but today you’ll really seriously purify it using fast protein liquid chromatography (FPLC). FPLC is sort of a silly name made up for machines that are conceptually similar to high pressure liquid chromatography (HPLC) but use a lower pressure and a much higher flowrate, thus making it feasible to purify large amounts of protein.
The bad news, at least in the Caughey lab, is that it has been found that the column in the AKTA Explorer FPLC machine has just enough capacity to purify PrP from 750 mL worth of bacterial culture, but not quite enough to purify PrP from a whole 1L. Until now, you’ve been working with four Falcon tubes in parallel. If your pellets are unusually small for some reason, you could combine them all, but if they are a normal size, your best bet is to throw one in the -20°C for a rainy day, and proceed with purifying the contents of just the other three. This hotdog bun deficit problem is one of the more annoying chokepoints in the whole recombinology process.
If you started making your GdnHCl solution last night, finish it today by Q.S.ing to 50 mL and filtering through a 0.22 μm filter syringe. For the three pellets you’re using, mix each with 14 mL of the 8M GdnHCl solution, and grind them up on the tissue homogenizer like last time. Then set them on the rotisserie for 50 minutes. (Note added 2019-04-10: Since implementing this protocol at the Broad Institute, we have found that we get our best yields when we leave the PrP in 8M GdnHCl at 4°C for at least one week. One theory is this gives the intramolecular disulfide bonds time to form. We’ve noticed that some published papers likewise specifically call for leaving PrP in guanidine for two or more days [Mehlhorn 1996, McDonald 2019].)
In the meantime, while you are waiting for the PrP to denature, you can set up several other things. In the particular case of using the AKTA Explorer, you need to clean lines A and B with 5 minutes’ flow of dH2O, adding these settings from the control software’s Manual menu:
- Pump > Flow 5 mL/min, click Insert
- Pump > Gradient > Target 50% B, click Insert (means 50% A line and 50% B line, to clean both)
- Pump > Length = 0 min (time to ramp up to 50% B - can do it instantly)
- Flowpath > Bypass the column of interest, you’ll clean that separately
- Other > End Timer = 5 min (duration of rinse)
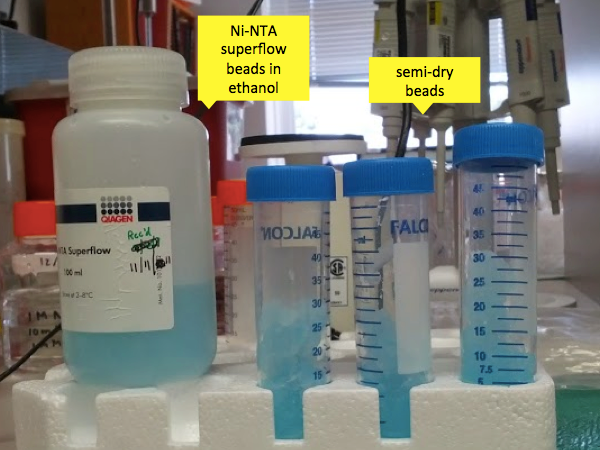
You also need to prepare the beads for the column. We used Qiagen Ni-NTA Superflow beads, which come in 500 mL bottle that is about half beads and half ethanol. Andy has emphasized that he has found the Qiagen Ni-NTA Superflow beads to be functionally better than the cheaper Thermo Fisher beads; he has not tested any other brands but strongly recommends using Qiagen. The beads are stored in the fridge but can be warmed to room temperature and mixed into a slurry by placing on the bottle on its side on a tabletop shaker on a gentle setting. (You may need to put the bottle in a box to keep it from rolling off the shaker). These nickel-coated beads will be used to purify PrP by its nickel affinity. Often, people express recombinant proteins with a “His tag” - say, six or so histidines hanging off one end of the protein, so that they can purify that protein based on the exceptional affinity of histidines for nickel. But full-length PrP has 10 histidines all on its own, and even N-terminally truncated PrP (say, HuPrP90-230) still has 6 histidines:
huprp_string = "MANLGCWMLVLFVATWSDLGLCKKRPKPGGWNTGGSRYPGQGSPGGNRYPPQGGGGWGQPHGGGWGQPHGGGWGQPHGGGWGQPHGGGWGQGGGTHSQWNKPSKPKTNMKHMAGAAAAGAVVGGLGGYMLGSAMSRPIIHFGSDYEDRYYRENMHRYPNQVYYRPMDEYSNQNNFVHDCVNITIKQHTVTTTTKGENFTETDVKMMERVVEQMCITQYERESQAYYQRGSSMVLFSSPPVILLISFLIFLIVG"
huprp = strsplit(huprp_string,"")[[1]]
sum(huprp[23:230]=="H")
# 10
sum(huprp[90:230]=="H")
# 6
This means that PrP all on its own will bind nickel - in fact, if you add a His tag to it, it has such great affinity for nickel that it can be hard to elute afterward.
The Ni-NTA beads come in more ethanol than you need, so you have to remove some of it. Grab yourself a Nalgene vacuum flask and pour about 170 mL of the solution into the top before you connect the vacuum. Now, you have to work fast because you need to remove much of the ethanol from the beads but if you let them get too dry it will damage them. So connect the vacuum and then watch the surface very carefully. What starts out looking like a clear but viscous blue liquid will quickly appear solid, like a blue raspberry Slurpee that someone has sucked all the liquid out of the bottom of. The instant that you start to see cracking on the surface, remove the vacuum hose. In just the time it takes you to react, the beads will already appear more solid than liquid. Move to the scale and scoop out 18g of the semi-dry beads into each of three 50 mL Falcon tubes and cap them. 18g of beads is the amount required to purify PrP from ~250 mL worth of bacterial culture, and we’re doing 750 mL. Any leftover beads can be returned to the source container with a bit of the ethanol that you just removed from them.
Now pour your denaturing buffer (see above; different from the 8M GdnHCl) over the beads in each tube, to Q.S. each of them to 30 mL. Rotisserie the tubes at room temperature for 10 minutes or until your PrP-containing supernatant is done rotisserieing, whichever is longer.
Meanwhile, repeat the above rinsing procedure on the AKTA Explorer, but this time with denaturing buffer instead of water. This is to fill both lines with denaturing buffer. Note you’re doing 5 mL/min for 5 min, so you’ll need >25 mL, of which 12.5 mL will go through tube A and 12.5 mL through tube B.
The rinse settings should be bypassing the column of interest, so this is a good time to remove the column and clean it. (This assumes you are in a “defensive washing” scenario; if you or another user already thoroughly cleaned the column after last use and you trust that cleaning, you can skip this step). Inject tap water, then air, through the column to flush the old beads out into the biohazard bin. Take the column apart and rinse every part in tap water. Set the column up on a vertical clamp holder and inject denaturing buffer into the bottom of it to avoid any air bubbles that will prevent liquid from passing downward through the column.
By this time, your Falcon tubes containing PrP have probably been rotating for 50 minutes. During that time, the GdnHCl will have completely denatured the aggregated PrP into unfolded monomers which will be in solution. Spin the tubes at 8000g for 5 minutes. After spinning, remember, very important: this time the PrP is in the supernatant, not the pellet. The pellet is a small gooey translucent mass which probably consists mostly of nucleic acid. The pellet can be discarded.

Then pour the supernatant - which contains PrP - into the tubes with Ni-NTA beads and denaturing buffer, and set the mixture to rotisserie again for 40 minutes at room temperature. During this time the PrP will bind to the nickel on the beads, and therefore will not be lost while we use FPLC to flush out all the other unwanted molecules that we haven’t yet purified out by centrifugation.
These 40 minutes are a good time to finish making your refolding, elution and dialysis buffers if you haven’t already. When the 40 minutes are up, you can reassemble the column which you’ve washed, and clamp it into a vertical stand. Tighten all the pieces very tightly - it is amazing how tight they need to be in order to not have leakage. Use a syringe to inject some denaturing buffer backwards through the bottom, then let the bottom tube drip into a waste flask. Pour the contents (beads + PrP) of your three Falcon tubes into the top of the column. They probably won’t all fit right away, so wait and let some denaturing buffer drip out of the first two before you add the third. This step is called “packing the column”: you are filling it with beads which will stay in the column, while already unwanted, non-PrP molecules are dripping off of it and into waste. When you’ve managed to fit the contents of all three tubes into the column, add a bit of denaturing buffer on top so that there is some clear liquid on top of the blue beads. The top of the blue part of the column volume is called the “column head”, while the clear portion is called the “buffer head.”

Once that is done, screw the top of the column back on, tightly. Ratchet it down so that the column’s plunger is very close to the column head. As the machine runs, the pressure will back the beads more densely, so you will still get some buffer head between your plunger and the column head. Having the plunger close to the column head minimizes the opportunities for the gradient solutions (e.g. denaturing and refolding buffer) to mix before hitting the column. Place the column back onto the machine. The exact configuration is likely to vary, but at least on the Caughey lab’s machine, the top of the column connects to Position 2 of Column Valve V2, and the bottom of the column connects to Position 2 of Column Valve V3, which drains to the waste flask. Place input tube A into a flask of denaturing buffer and input tube B into a flask of refolding buffer.
Now you’re ready to run the FPLC machine. The Caughey lab has a saved procedure for this, which is named “A J PrP Refold 3X”. It is a 270-minute protocol. This is a solid 4.5 hour break in which you can do some other things, just make sure you have supplied enough denaturing and refolding buffer for the machine not to run dry, and do also come back and check on it once or twice during this time. Over the first 4 hours, the machine will flow 2.25 mL/min of liquid through the column, on a linear gradient from 100% denaturing buffer at first to 100% refolding buffer by the end. This gradual shift is needed for proper folding - apparently PrP will not fold correctly if you just hit it instantly with 100% refolding buffer. (Though Andy has experimented with refolding gradients as short as 1h and they appear to still work reasonably well). After the 4h gradient, the machine will push 100% refolding buffer through the column for the final half hour of the procedure. Here’s what the graph of the machine’s activity is likely to look like (these are the real data from our first purification):
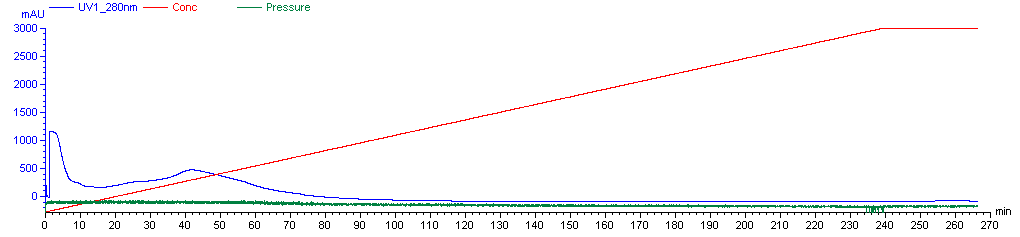
Plotted are the % refolding buffer (red), the A280 absorbance of liquid emerging from the column (blue) and the pressure (green). A280 absorbance is used to measure protein content, but at this step the A280 absorbance you’re seeing is largely due to unwanted contaminants, so don’t worry about it yet - more later. The pressure is likely to hover near ~0.07 MPa, which is megaPascals. It might be as high as .15 Mpa. If it gets above .3 MPa then you are at risk of damaging the machine and should stop and figure out what’s wrong; the Caughey lab’s AKTA has an alarm set so that it will shut off automatically at this pressure. Note that atmospheric pressure is ~.10 MPa. Hence this is not “high pressure” liquid chromatography.
After the 4.5h are up, you’ll come back to collect your PrP. At this point, the PrP in the column is still bound to the Ni-NTA beads, but it is no longer denatured as a linear chain of amino acids - it is in 100% refolding buffer which has allowed it to assume its native alpha-helical conformation. To get your PrP back from the beads, you will run elution buffer through the column. Elution buffer contains a high concentration (0.5M) of imidazole, which will outcompete PrP’s histidines to bind to the nickel, thus freeing PrP to drip out of the bottom of the column for you to collect.
First you need to clean input tube A, which is still full of denaturing buffer. Place input tube A into a flask of dH2O and, using the same rinse settings described above (and double check that you are bypassing the column or else you will lose your protein!), spend five minutes running water through tube A. Then place input tube A into elution buffer and run the exact same rinse protocol.
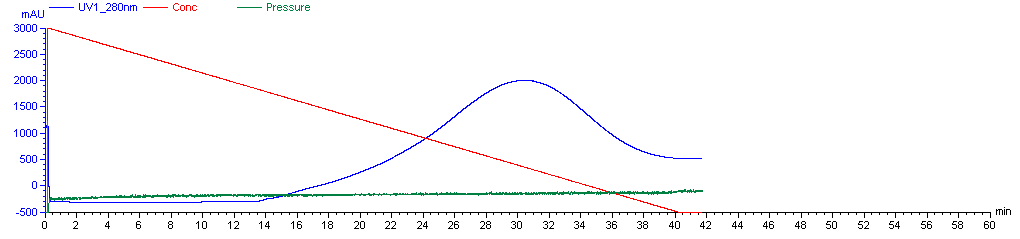
In the Caughey lab, the protocol for elution on the machine is “A J Elution 3X”. It is a 45-minute linear gradient with 6 mL/min from 100% tube B (refolding buffer) to 100% tube A (elution buffer) followed by 15 minutes of 100% elution buffer. Before you click execute, make sure you have a bucket of ice on hand with several Falcon tubes ready to collect different fractions of PrP eluting from the column. You ultimately want the PrP at pH 5.8, but the liquid flowing through the column will be a mix of refolding buffer (pH 8) and elution buffer (pH 5.8) and hence its pH will be somewhat higher than you want. You can add ~10 mL of dialysis buffer to each of the destination Falcon tubes before collecting rPrP into them, so that the pH is reduced a bit right off the bat.
Start the protocol, still with the outflow from the machine going into waste. But stand there and watch it carefully every minute - this is the important step. A280 will begin elevated and will taper off quickly - this initial shoulder is probably absorbance from unwanted nucleic acids and other proteins which are not bound to the beads. (Nucleic acid peak absorbance is at 260 nm but they have some absorbance at 280 nm too). Note that the AKTA Explorer will “zero” or “tare” itself at a nonzero A280 value, such that after the initial shoulder passes, the A280 will drop below zero. This is fine, and the numbers I will give in this post are on this scale, i.e. if the graph dips to -300 mAU and I say start collecting rPrP at 1500 mAU, that means start collecting when the graph reads 1500 mAU, i.e. when value is 1800 mAU above the “true” zero.

Typically, about 15 minutes into the protocol, i.e. when the mixture flowing through the column is about 33% elution buffer, A280 will begin to rise again. This time, the PrP is eluting, but early on, it is dilute and still mixed with contaminants, so don’t start collecting it right away. In a typical rPrP prep, the purest rPrP, everything worth collecting, will be found when the A280 rises above 1500 mAU. To be safe, you can collect eluent before and after the 1500 mAU value - say, when A280 hits 1200 mAU and until it dips back below 1200 mAU - but collect these as separate fractions in separate Falcon tubes, as you probably will not end up wanting them. So collect Fraction 1 from 1200 to 1500 mAU, then Fractions 2 and 3 while A280 is above 1500 mAU, and then Fraction 4 after it drops below 1500 mAU again. When A280 drops below 1200 mAU, you can shut the machine off and not finish the protocol. Here is the curve from our first rPrP purification:
The best fractions - collected when A280 was above 1500 mAU - can be combined. Filter them through a 0.22 μm syringe filter to remove any aggregated imidazole which might otherwise nucleate protein precipitation during the dialysis step. At this point you have probably ~100 mL of a solution with pretty pure rPrP. Andy has found experimentally that these fractions make for a substrate that is most sensitive at detecting prions in RT-QuIC. Although you can get more total protein by collecting broader fractions over the shoulders of the A280 curve, it is more likely to be contaminated. Andy has also found that some rPrP is left on the beads after the end of the elution protocol, but that this rPrP is more aggregated or precipitated and does not make a suitable substrate.
Now that you have your rPrP, the only catch is that the solution still contains a high concentration of imidazole. So in the next step, you’ll use dialysis to remove the imidazole by diffusion. For this we use SnakeSkin Dialysis Tubing which has a molecular weight cutoff of 7 kDa - i.e., rPrP, which is 16 kDa (N-terminally truncated) or 22 kDa (full-length) will stay in the tubing, while imidazole and other chemicals, which are small, will diffuse into the vastly larger volume of dialysis buffer in which the tube is floated. So for each ~50 mL of PrP solution, remove 20 or 30 cm of dialysis tubing and wet the bottom end, fold it over and clip it shut. Then hold it with one hand and very carefully pour the PrP solution into the tubing. Then wet the top of the tube, fold it over and clip it shut too. Do all this over some sort of sterile flask where if you have a leak and lose PrP solution, you can still recover it. Once the tubing is clipped shut, hold it right side up and upside down for a second each and check that it is not leaking. Once you are confident that it is not leaking, attach a styrofoam floatie to the top of the tube and set it to float in 3.6L of dialysis buffer.

You will probably need two dialysis tubes for one batch. Place each one in its own 3.6L of dialysis buffer and leave them, with a stir bar at the bottom, on a stir plate at low speed (too high a speed will raise the risk of tearing the dialysis tubing) in the 4°C overnight.
Before you go home, return to the AKTA Explorer and rinse both tubes A and B with dH2O for 5 minutes to clean the machine. Save the plots (like I’ve shown above) for your records.
Day 5
First thing in the morning, remove the two dialysis tubings from their buffers, discard the buffers, and move them both (together) into a third 3.6L beaker of dialysis buffer to stir slowly at 4°C. They’ll spend a few hours losing even more imidazole before you proceed.
After a few hours of this second round of dialysis, you should filter the PrP through a 0.22 μm filter to remove oligomeric species. When filtering through the syringe, take care to drip the solution down the side of the destination container, to minimize bubbles, which can encourage oligomerization of PrP.
Now you may want to measure the concentration of PrP. This protocol typically gives results in the 0.4 - 0.6 mg/mL range. However note that when you compute the amount of rPrP solution to add to your RT-QuIC master mix, you want the concentration after a final round of filtering which takes place after thawing rPrP aliquots on the day of the RT-QuIC experiment. Therefore you can measure rPrP concentration today to get a ballpark figure that will tell you how much rPrP to thaw for your experiment, but re-measure it before you make up master mix.
This means it’s time to explain A280. Three aromatic amino acids - W, Y and F - absorb light with a peak absorption wavelength of 280 nm. Therefore a sample’s absorbance at 280nm (A280) can be used to measure its protein content. The AKTA Explorer gives A280 in units of mAU (milli-absorbance units), but this is zeroed to the absorbance of the refolding buffer, is measured before dialysis and filtration, and the AKTA also does not give you an average A280 value over the fractions you collected. Therefore you’ll use the NanoDrop machine to measure A280, zeroed to the absorbance of pure water. First wash the NanoDrop twice with dH2O, then zero it on a dH2O droplet, then measure the A280 of your sample three times. Take the average of these three measurements, and then divide it by an extinction coefficient which you can calculate using ExPASy ProtParam or other online tools. The answer is very slightly different depending on whether you assume the cysteines are reduced or form a disulfide bond, but this doesn’t matter for the first couple of significant digits, which is all we care about anyway. Here are some commonly used rPrP sequences:
>HuPrP23-230
KKRPKPGGWNTGGSRYPGQGSPGGNRYPPQGGGGWGQPHGGGWGQPHGGGWGQPHGGGWGQPHGGGWGQGGGTHSQWNKPSKPKTNMKHMAGAAAAGAVVGGLGGYMLGSAMSRPIIHFGSDYEDRYYRENMHRYPNQVYYRPMDEYSNQNNFVHDCVNITIKQHTVTTTTKGENFTETDVKMMERVVEQMCITQYERESQAYYQRGS
>HuPrP90-230
GQGGGTHSQWNKPSKPKTNMKHMAGAAAAGAVVGGLGGYMLGSAMSRPIIHFGSDYEDRYYRENMHRYPNQVYYRPMDEYSNQNNFVHDCVNITIKQHTVTTTTKGENFTETDVKMMERVVEQMCITQYERESQAYYQRGS
>MoPrP23-230
KKRPKPGGWNTGGSRYPGQGSPGGNRYPPQGGTWGQPHGGGWGQPHGGSWGQPHGGSWGQPHGGGWGQGGGTHNQWNKPSKPKTNLKHVAGAAAAGAVVGGLGGYMLGSAMSRPMIHFGNDWEDRYYRENMYRYPNQVYYRPVDQYSNQNNFVHDCVNITIKQHTVTTTTKGENFTETDVKMMERVVEQMCVTQYQKESQAYYDGRRS
>MoPrP90-230
QGGGTHNQWNKPSKPKTNLKHVAGAAAAGAVVGGLGGYMLGSAMSRPMIHFGNDWEDRYYRENMYRYPNQVYYRPVDQYSNQNNFVHDCVNITIKQHTVTTTTKGENFTETDVKMMERVVEQMCVTQYQKESQAYYDGRRS
>SHaPrP23-231
KKRPKPGGWNTGGSRYPGQGSPGGNRYPPQGGGTWGQPHGGGWGQPHGGGWGQPHGGGWGQPHGGGWGQGGGTHNQWNKPNKPKTSMKHMAGAAAAGAVVGGLGGYMLGSAMSRPMLHFGNDWEDRYYRENMNRYPNQVYYRPVDQYNNQNNFVHDCVNITIKQHTVTTTTKGENFTETDVKMMERVVEQMCVTQYQKESQAYYDGRRS
>SHaPrP90-231
GQGGGTHNQWNKPNKPKTSMKHMAGAAAAGAVVGGLGGYMLGSAMSRPMLHFGNDWEDRYYRENMNRYPNQVYYRPVDQYNNQNNFVHDCVNITIKQHTVTTTTKGENFTETDVKMMERVVEQMCVTQYQKESQAYYDGRRS
>BvPrP23-231
KKRPKPGGWNTGGSRYPGQGSPGGNRYPPQGGGTWGQPHGGGWGQPHGGGWGQPHGGGWGQPHGGGWGQGGGTHNQWNKPSKPKTNMKHVAGAAAAGAVVGGLGGYMLGSAMSRPMIHFGNDWEDRYYRENMNRYPNQVYYRPVDQYNNQNNFVHDCVNITIKQHTVTTTTKGENFTETDVKMMERVVEQMCVTQYQKESQAYYEGRSS
>BvPrP90-231
GQGGGTHNQWNKPSKPKTNMKHVAGAAAAGAVVGGLGGYMLGSAMSRPMIHFGNDWEDRYYRENMNRYPNQVYYRPVDQYNNQNNFVHDCVNITIKQHTVTTTTKGENFTETDVKMMERVVEQMCVTQYQKESQAYYEGRSS
And here are their (reduced) extinction coefficients from ExPASy:
| PrP | M-1 | L/g |
| HuPrP23-230 | 57870 | 2.548 |
| HuPrP90-230 | 21890 | 1.366 |
| MoPrP23-231 | 63370 | 2.757 |
| MoPrP90-231 | 27390 | 1.691 |
| SHaPrP23-231 | 61880 | 2.695 |
| SHaPrP90-231 | 25900 | 1.596 |
| BvPrP23-231 | 61880 | 2.706 |
| BvPrP90-231 | 25900 | 1.605 |
RT-QuIC protocols call for rPrP concentration in mg/mL (rather than molarity), so just divide your A280 figure by the figure in the L/g column to get a protein concentration in mg/mL.
Once you’ve measured your protein concentration, you would typically divide your rPrP into 1 mL aliquots to be frozen in the -80°C.

Though this protocol is pretty reliable, you still need to test the validity of every batch by running RT-QuIC on it. So another day, when you have time or some spare space on an RT-QuIC plate, you’ll thaw an aliquot and test a positive and negative control sample with this rPrP as the substrate. Remember to re-measure your protein concentration on the NanoDrop after you thaw and filter. If positive controls turn positive and negatives turn negative, congratulations - you made a good batch. In practice, it has been found that different rPrP sequences have different intrinsic stabilities. For instance, rSHaPrP90-231 is an excellent substrate - at 300 mM NaCl and 42 °C, wells mock-seeded with normal brain homogenate often show no ThT fluorescence above baseline for >80 hours, whereas positive, 263K prion-seeded wells very reliably turn positive. It thus gives exceptional ability to distinguish positive and negative samples. Mouse PrP, by contrast, is less excellent, though still quite useful. All preparations of rMoPrP23-231 seem to give ThT fluorescence in negative samples after about 40-60 hours. Of course, positive samples turn positive in maybe 20 hours under the same conditions, so RT-QuIC with rMoPrP23-231 as substrate still has power to discriminate between the two. Time to positive signal for any given substrate depends on salt concentration, temperature and shaking speed. So when you run RT-QuIC on your new batch of rPrP, results need to be compared to other batches of the same PrP sequence, run under the same conditions. At the end of the day, if your rPrP substrate is able to distinguish the positive from the negative by margin you are comfortable with, then it’s a good batch.

As shown above, at 130 mM NaCl, our batch of rMoPrP23-231 was plenty robust enough to distinguish normal brain homogenate (NBH) from RML brain homogenate at a 1e-5 dilution, though it didn’t distinguish NBH very well from 1e-9 RML. But this is about as good as it gets with rMoPrP23-231, so we were satisfied.
We owe a huge debt of gratitude to Andy Hughson, who patiently trained us on all of this and has spent countless hours fine-tuning this protocol.

About Eric Vallabh Minikel
Eric Vallabh Minikel is on a lifelong quest to prevent prion disease. He is a scientist based at the Broad Institute of MIT and Harvard.