Our first recombinant PrP prep at Broad
introduction
Last July, Andy Hughson, of the Caughey lab at Rocky Mountain Laboratories, spent a week walking me and Sonia through every step of his protocol for purifying recombinant PrP. I wrote a blog post documenting everything I learned. In the year and a half since then, a number of scientists have told me or Andy that, using that blog post as a reference, they had successfully implemented the whole protocol in their own lab. Funnily enough, in all that time, I myself never ran the protocol a second time, and so had no first-hand experience of how difficult it is to set up, or whether my notes provided sufficient detail to re-create the whole procedure from scratch.
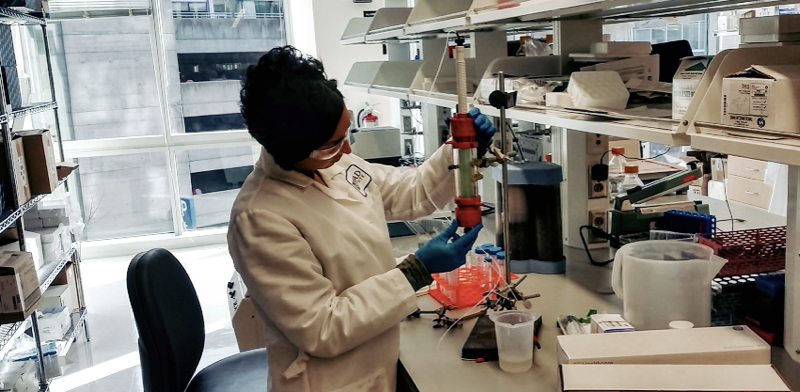
Finally, this month, Sonia and I finished purifying our second-ever batch of recombinant PrP, and our first batch produced here at the Broad Institute, our new scientific home in Cambridge, MA. The purpose of today’s post is to document and reflect on my own experience of implementing the protocol in a lab where recombinant PrP has never been produced before.
I’ll return to some overall conclusions at the end of the post, but here is a quick preview of some major points up front:
- Wow, it’s hard to set up a protocol from scratch in a new lab! It took us 3 months, with many false starts when we realized we didn’t have something we needed.
- Wow, it’s hard to get something right on the first try! In the end, we did successfully purify PrP, but with a low yield, only about 8 mg, compared to 40-60 mg expected. We’re still troubleshooting why.
- The more we talked with biochemists here, the more we realized this is a pretty unusual protocol. I’m not ready to start tweaking it yet (always get the thing you know works to work before you wander off and modify it), but I will discuss some of the peculiarities.
- I’m working on a draft of a more concise checklist (as a complement to the incredibly detailed and lengthy original post) to make sure I do everything right next time.
a summary of our purification and its hiccups
Here I’ll summarize what we did and which points were hard. This is kind of boring and partly here for my own reference, so feel free to skip past it.
September: recombinant PrP sequences
We received five different recombinant PrP glycerol stocks from Andy back in September: HuPrP23-230, MoPrP23-230, BvPrP23-231, SHaPrP23-230, and SHaPrP90-230. Each one is in a pET41 vector inside Rosetta E. coli. (For reference, the hamster version of this stock was described in [Wilham 2010]). The first thing we set out to do was make sure we had the right sequences. We grew up 4 mL mini-cultures of each and Qiagen mini-prep’ed some DNA from each and sent it off for sequencing with the T7 universal forward primer, which matches sequence upsteam of the ORF in the pET41 vector.
Survey for my readers: what software tools do you normally use to compare your empirical sequences to the expected reference sequence? Sonia uploaded the sequences into Benchling and I aligned them with EMBOSS, but in either case, it is always super annoying to then try to figure out which codon a given base corresponds to, and what reading frame you are in. If anyone knows a good solution to this, let me know.
Anyway, after laboriously comparing the sequences, everything looked great, but I’ll just note a couple of items that we spent time trying to get our heads around, in case anyone else who finds this post is ever confused about the same things.

As shown at left, we discovered that both SHaPrP sequences contain a T→C SNP in the third base of codon 132, relative to reference sequence K02234. This just encodes a synonymous substitution from AGT (serine) to AGC (serine) - no problem there.
And as shown at right, we discovered that “MoPrP23-230” is not a typo. Although I’d seen in the literature that some other groups (see e.g. [Qin 2002]) consider MoPrP23-231 to represent the full, post-translationally modified protein, the Caughey lab’s construct does indeed terminate after codon 230. As you can see in these multiple alignments, most species have exactly two serines at or around codon 230. The canonical GPI anchor attachment site is then considered to be between the two serines. Mouse PrP has three serines here, so labs apparently differ on which cut site they consider to the the canonical endpoint of the post-translationally modified protein, which is perfectly reasonable - I have never seen any hard data on where exactly mouse PrP gets cut in vivo and it’s possible that GPI attachment is a noisy and imperfect process anyway.
In any event, our sequences validated that the PrP plasmid was still present in the bacteria and hadn’t mutated, so we set out to proceed on purifying protein.
October-November: bacterial pellet fractioning
Our goal was to purify full-length human prion protein. We used the HuPrP23-230 construct, and induced with the EMD Millipore Overnight Express kit, which wasn’t how we did it last time (that time, we used a homemade induction recipe), but is a validated alternative that Andy has gotten to work many times. Despite our promises to Andy that we would follow his protocol exactly to the letter, we stumbled onto inconsistencies immediately upon beginning the protocol. Whereas Andy grows his 1L of bacterial culture in a plastic, four liter bottle with a vented cap and a “baffled” bottom (meaning the base has a ridge to increase aeration), we couldn’t find any such bottle in our lab (nor for sale online), so we just used a 2L glass Erlenmeyer flask with loosely scrunched aluminum foil as a breathable lid. Could the smaller volume and lack of bafflement mean that our bacteria were suffocating and therefore produced less PrP? These are the questions I wonder about. In any event, after 18.5 hours the bacteria at least looked pretty confluent by the naked eye:

And after we spun it down, the pellets looked about the same time as last time. Thinking (correctly) that we’d probably end up with a sub-par yield, we figured we’d try to maximize yield by just proceeding with all four pellets (corresponding to all 1L of bacterial culture) rather than just three, as we had last time.
We froze the pellets down, and as we tried to proceed to Day 3 of the protocol, it started to sink in just how many details need to be sorted out before you can run a new protocol for the first time. Our mentor in the wet lab, Amedeo Vetere, had sat down with us at the outset and carefully gone over the protocol and helped us figured out what all we had in the lab and what all we needed to buy, which was amazingly helpful. But even still, there were just so many things you don’t realize until you get in there and try to actually carry out the protocol. For instance, we bought an OMNI tissue homogenizer to grind the pellets, but then had to put off the prep for a week when we realized we needed to also order this adapter in order to use the disposable tips. We then put things off again when we discovered that the huge bottle of guanidine hydrochloride that we planned to use was almost empty, and again when it turned out we had ordered too small a volume of Ni-NTA beads. And so on and so on.
At some point in this several weeks long cycle of procurement and postponement, we did manage to complete Day 3 of the protocol, which meant basically lysing and washing our bacterial pellets. Simple as this is, we still hit hiccups: our high-speed centrifuge requires special tubes, one of which cracked on the second spin, thus requiring us to merge 4 pellets into 2 before proceeding; and we miscalculated and ran out of BugBuster, so ended up washing the pellets in a more dilute solution thereof than was originally called for.
December: affinity purification
In addition to the hiccups mentioned above, Day 4 of the protocol, where we actually purify PrP using nickel affinity chromatography, was hard to schedule. It’s a really long continuous day in the lab (it ended up taking us 13 hours at a stretch), and with the constraints of classes and final exams and needing the right people to be available to train and supervise us, it took weeks to find a viable date. An expert biochemist at the Broad ended up supervising/checking in on us at a couple of points, and his guidance proved immensely helpful. As far as the long lab day, he also pointed out that we could probably add another breakpoint by just keeping the solubilized PrP sitting in 8M GdnHCl at 4°C overnight or even for several days. Adding another breakpoint is important not just for one’s own stamina, but also for being able to carry out the protocol correctly. In our case, we got up really early to start the protocol, which had the drawback that when we discovered someone had swapped out the rotor in the Sorvall centrifuge and we didn’t know where the tools to change it out were stored, there was no one at work yet who we could ask. So instead of spinning the solubilized PrP in guanidine for 5 minutes at 8000g per protocol, we ended up spinning it for 15 minutes at 4250g (the max speed of the other available centrifuge in the lab).
When we got to the stage of using the AKTA purifier, our fast protein liquid chromatography machine, the hiccups continued. With a lot of help we managed to figure out how to operate the software and make sure that our column was hooked up correctly so that we weren’t just completely bypassing it or something. But several things still diverged from protocol. Our original prep was done at room temperature - that’s how things work in the Caughey lab - but our AKTA (like all other AKTAs at Broad) lives at 4°C - the whole machine is in a cold room. Everyone seems to think this is categorially better for proteins in general. But since it hasn’t been tested for PrP in particular, I have no idea how that might affect the rate at which PrP re-folds and whether it might affect our yield, but it seems like a potentially big change. We also eluted at the wrong flow rate (4 mL/min instead of 6 mL/min; my bad).
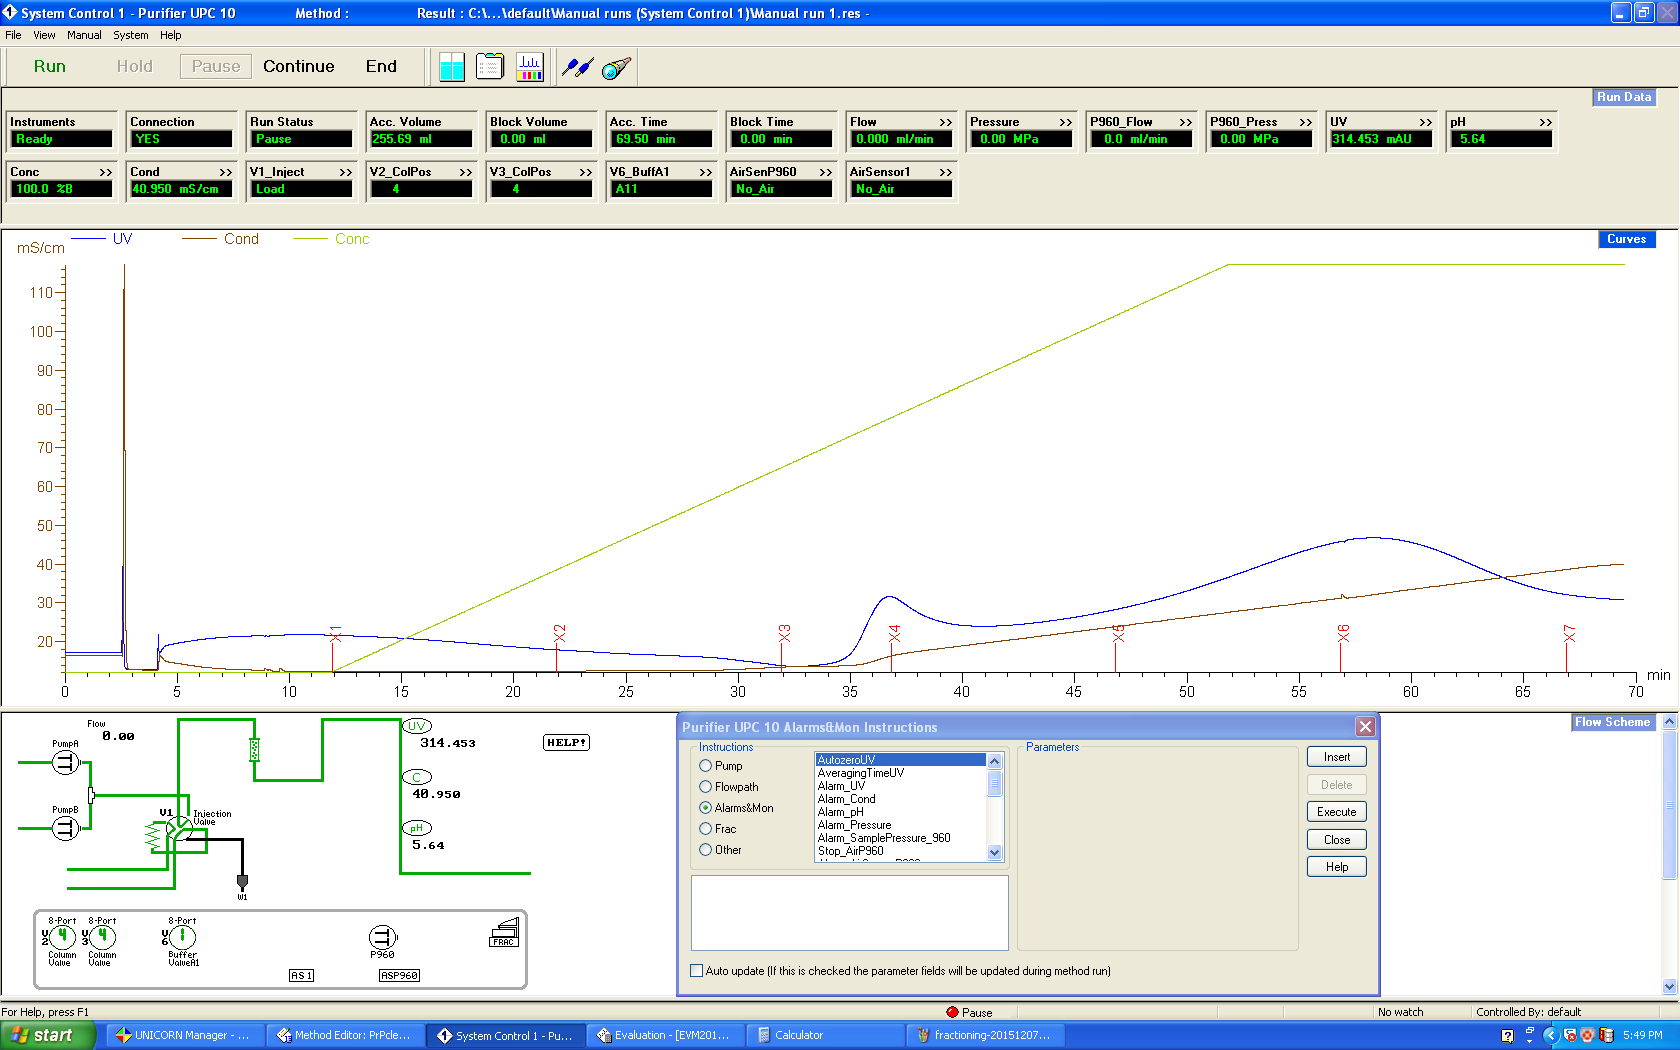
At the end of all this, we got this elution curve, which I’ve annotated (raw version here):
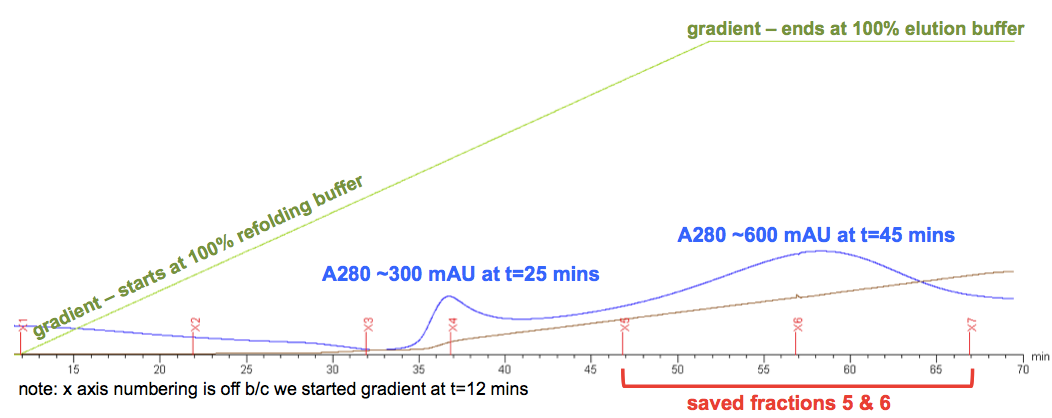
Andy and our colleagues here agreed that the first A280 peak, at about t = 25 minutes, is something that is only weakly bound to the column, perhaps some sort of contaminant, and definitely not of interest. The PrP lies instead in the second peak, centered at t = 45 minutes. But a few things are weird about that peak. First, it’s pretty low. For a “3X batch” (i.e. 750 mL of bacterial culture - and remember, ours was a 4X batch), Andy says he normally expects the peak to reach ~1800 mAU, and ours only ever reached 600 mAU. It also came much later than expected - when we did this at RML last summer, the peak began around t = 15 minutes, and was centered at about t = 30 minutes. This might be partly (though not completely) explained by our lower flow rate. As our biochemist friend pointed out to us, the gradient curve here is just measuring what’s going into the column, but the column itself has a volume of maybe 70 mL (πr2h for a 2.6 cm diameter, 20 cm height column is 106.2 cm3, though not the full height is used), so at a flow rate of 4 mL/min the average concentration of elution buffer in the column lags the nominal gradient by over 15 minutes. If we’d eluted at 6 mL/min it would only lag by maybe 10 minutes.
But at least we had a peak. After dialyzing, merging, filtering, and freezing our fractions 5 and 6 (annotated above), we used a NanoDrop to check the concentration. Here’s what the NanoDrop readout looked like:

I had seen curves like this many times but never knew how to interpret the huge shoulder of absorbance at left (rising towards 220 nm). Apparently that’s the absorbance of the peptide backbone. The (smaller) peak at A280 is absorbance of the aromatic residues (F, W, & Y) in the protein and is all you care about. We measured A280 absorbance five times and got answers ranging .18 to .21, so we took .20 as the ballpark result.
To convert from A280 to protein concentration, the formula is as follows:
\[A280 = E \times b \times c\]Where:
- E is the extinction coefficient in units of M-1cm-1 (for HuPrP 23-230, the value is 57,995)
- b is the path length in units of cm. Confusingly, on NanoDrop machines, the physical path length (thickness of the water droplet the laser beam passes through) is only 1mm, but the machine automatically converts the true reading into an equivalent value for a path length of 1 cm, as explained here: “For Nucleic Acid, Protein A280 and Proteins and Labels modules, data are normalized to a 1.0 cm (10.0 mm) path”.
- c is the concentration in units of M
So if you have an A280 reading on a NanoDrop, you can reason that your concentration in M is A280 / (E×b), and your concentration in mg/mL is (A280×MW) / (E×b). In our case, our A280 readings averaged ~.2, our E is 57,995 M-1cm-1, our MW is 22,715 g/mol, and our path length is 1cm, so our concentration works out to .2/57995 = 3.4 μM or 22715*.2/57995 = 0.08 mg/mL. This means that our total prep, which was on the order of 100 mL, was only about 8 mg of protein.
0.08 mg/mL is lower than the desired final reaction concentration (.1 mg/mL) for RT-QuIC, so this protein would be unusable for RT-QuIC without another step to concentrate it. But it is fine for a number of other assays that we can use to confirm that the protein is PrP and that it’s folded correctly (running a gel, circular dichroism, etc.) for a number of other biophysical assays.
the debrief
So we ended up with ~8 mg of protein - probably about 15-20% of the expected yield. Not exactly a screaming success. But we did get some protein, and follow-up assays (additional posts forthcoming) have so far suggested that it does seem to be folded correctly. Our advisor, Stuart Schreiber, opined that to have gotten any correctly folded protein on the first try had already put us at risk of using up all our good luck in one shot. So maybe things aren’t so bad. Still, I would sure love to be able to get a better yield next time. Sonia and I sat down and put together a list of everything that we’d done wrong or differently from protocol, and here’s what we came up with:
- Used a smaller, glass, less well-vented, non-baffled Erlenmeyer flask for bacterial growth (Day 1).
- Proceeded through purification with a 4x, rather than 3x batch of inclusion bodies (Day 2-4).
- Ran out of BugBuster and therefore used reduced concentrations / mostly PBS for washing the pellets (Day 2).
- Combined the inclusion bodies into 2, rather than 4 pellets, because one of the centrifuge tubes cracked (Day 3).
- Spun guanidine-solubulized pellets for 15 minutes at 4250 x g instead of 5 minutes at 8000 x g (Day 4).
- Used an AKTApurifier FPLC machine, not an AKTA Explorer, and we manually directed the steps of the protocol (Day 4).
- AKTApurifier is kept in the cold room instead of at room temperature (Day 4).
- Eluted at a flow rate of 4 mL/min rather than 6 mL/min (Day 4).
- Neglected to filter fractions through a 0.22 μm syringe before dialysis, instead only filtered after dialysis (Day 4).
There are probably other things we didn’t even notice. But at least this gives us a starting point to try to do better next time.
reflections on the protocol
As we carried out the protocol and told our peers and mentors what we were doing, a number of points about the protocol struck people as odd. I am curious as to why these things are so.
- His tag-free purification. No one had ever heard of a protein that could be purified by Ni-NTA without a His tag before. When I explained that PrP contains 10 endogenous histidines, that seemed to satisfy most people. But people raised it again when the question arose of why our yields are low relative to the amount of beads that we use (see next bullet).
- Consumption of Ni-NTA beads. Most of the other nickel affinity protocols our colleagues had heard of - all for His-tagged proteins - used only 5 mL or 15 mL of Ni-NTA bead resin per batch. Qiagen advertises that its Ni-NTA beads can bind up to 50 mg of protein per mL of resin. So why were we using on the order of 100 mL of resin to get (if the protocol had worked perfectly) just 60 mg of protein? One possibility is that PrP’s 10 histidines, spread throughout the protein, don’t bind as strongly to nickel as the 6-10 consecutive histidines that make up a His tag. If so, that’s frustrating, as the Ni-NTA beads are the single most expensive reagent for this protocol. But Andy tells us he’s tried adding a His tag to PrP and that it binds so tightly to the beads that it becomes impossible to elute. So maybe there is no good solution to this.
-
Elution with imidazole at acidic pH. Qiagen advertises that “Purified proteins are eluted under mild conditions by adding 100–250 mM imidazole as competitor or by a reduction in pH.” The principle here, a colleague explained to us, is that the nitrogen at position 3 of the imidazole ring of the histidine (indicated by arrow) coordinates the nickel only when it is deprotonated (as shown below).

You can release the histidine from nickel either by outcompeting it with a higher molar concentration of free imidazole, or by reducing the pH until that nitrogen gets protonated. In this protocol, though, the elution buffer is pH 5.8, meaning that the majority of the imidazole in the elution buffer is going to be protonated. Therefore the imidazole would be unable to compete the histidine off of the nickel, and it must just be the pH that is doing the eluting.
I am not ready to start tinkering with the protocol, but I am curious about these points if anyone has thoughts to share.
a draft checklist
Sonia recently read Atul Gawande’s The Checklist Manifesto and it got us excited about the idea that maybe having checklists in the lab could save us from a lot of silly mistakes. In addition to the things we did wrong as described above, there were loads of other things we nearly did wrong, and then had to waste time or reagents in correcting. We had both my blog post and Andy’s protocol on the bench with us, but they’re both so dense and detailed that it’s easy to miss things. A good checklist is not exhaustive, but covers only the most critical and most easily forgotten items. Figuring out which those are will take many more tries at this protocol, but as a first pass, hopefully better than nothing, here are some things that come to mind.
Durable goods (for first time only)
- OMNI tissue homogenizer
- Adapter
- Disposable tips
- GE Healthcare XK 26/20 column
- High-speed centrifuge (up to 50 mL at 13,000g)
- High-volume centrifuge (up to 250 mL at 3,000g)
- FPLC (AKTApurifier or similar)
- Bacterial shaker/incubator
- NanoDrop spectrometer
- 4L bacterial culture flask
- 8L dialysis bucket
Consumables (check every time)
- Sufficent supplies of stock chemicals:
- Guanidine hydrochloride
- Sodium phosphate dibasic
- Sodium phosphate monobasic
- Tris
- Imidazole
- Strong HCl for pH adjustment
- 1L LB
- Kanamycin & chloramphenicol
- EMD Millipore Overnight Express induction system
- ≥200 mL of Novagen BugBuster
- ≥200 mL of Ni-NTA resin
- Snakeskin dialysis tubing (7,000 MWCO)
- Vacuum flasks for filtering buffers and straining Ni-NTA beads
- Two syringes with 0.22 μM filter tips for filtering protein
- Screw cap tubes for freezing aliquotted protein
Before starting
- Make at least 750 mL of each of the five buffers in advance.
- Adjust pH before adding GdnHCl.
- Add only a very small volume of buffer to GdnHCl before you Q.S.
- Reserve time on FPLC and any other equipment requiring reservations.
- Ensure that required supplies (see above) are available.
- Coordinate scheduling with any colleagues who will help or consult.
Day 1
- Add antibiotics to LB.
- Start mini-cultures at least 6 hours before you need to leave.
- Add induction media to 1L culture.
Day 2
- Retrieve 1L culture after ~20h (check OD50 if unsure of confluence).
Day 3
- Remove pellets to thaw 30 minutes before you are ready to start.
Day 4
- Rinse Ni-NTA beads in water before straining and measuring.
- Q.S. 18g of Ni-NTA beads to 30 mL with denaturing buffer and rotate ≥10 minutes before adding PrP.
- After mixing PrP pellets with 8M GdnHCl and then centrifuging, reserve the supernatant, not the pellet.
- Avoid using HCl to pH the dialysis buffer if you plan to perform circular dichroism later.
- Make 7.2L of dialysis buffer and chill it.
- Check that a path is available for your column on the FPLC.
- Flush lines with water and then buffers A and B before using FPLC.
- Loosen black screws on column before loosening red parts.
- Tighten all screws on column before attaching.
- Check for leaks before running gradient.
- Run refolding gradient at 2.25 mL/min.
- Set refolding gradient to 240 minutes but pause timer to 270 minutes.
- Elute at 6 mL/min.
- Filter reserved fractions before dialyzing.
- Rinse FPLC lines with 20% ethanol before going home.
Day 5
- Move tubes to a new 3.6L dialysis in the morning.
- After dialysis completes, reserve 20 mL of dialysis buffer as blank for downstream QC.
- Filter reserved fractions after dialyzing.
So far this is just stuff we’ve either forgotten, or worried about forgetting. Any readers who’ve done the Rocky Mountain recombinant protocol and have suggestions of what else merits a spot on the checklist, please leave a comment.

About Eric Vallabh Minikel
Eric Vallabh Minikel is on a lifelong quest to prevent prion disease. He is a scientist based at the Broad Institute of MIT and Harvard.